- Services
- IT Support Sunshine Coast
- Web Design Sunshine Coast
- IT Blog
- About Us
- Contact Us

0


Microsoft has announced that it will be doubling the storage provided to 50GB from the current 25GB provided. Most users probably haven’t reached the ceiling of 25GB yet however it makes what is already a very attractive enterprise-grade email solution even better.
The mailbox size will be automatically implemented so Exchange Online Users will not have to do anything in order to benefit. If you are currently holding your old emails in a local archive PST, it might be a great time to upload all that content into the cloud so it is easily accessible from all your devices.
For more information on Exchange Online, please see our dedicated Exchange Online page. We are reseller for Microsoft Cloud Solutions and experts in converting businesses over to Exchange Online – the best hosted cloud email solution. We have found it makes the world of difference to businesses still running traditional POP or IMAP email services. If your business is still running on POP mail give us a call and find out about the many benefits.

If you have a machine still running Windows XP you may be missing the Security Tab when you view the folder properties. This could be for a number of reasons:
- The drive is in FAT32 instead of NTFS
- You are running Windows XP Home (it does not feature advanced file sharing with the security tab)
- Advanced File Sharing is not enabled on Windows XP Professional – this we can fix.
If you are running XP Pro and your drive is formatted in NTFS then go into Windows Explorer.
Go to the Tools menu -> Folder Options and then to the View Tab.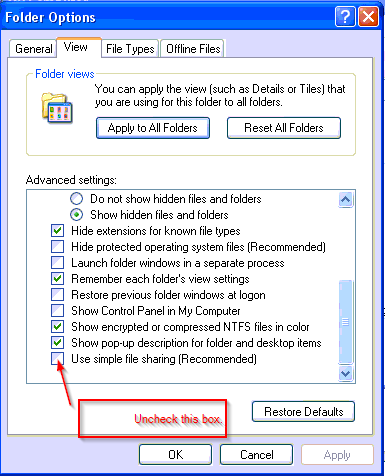
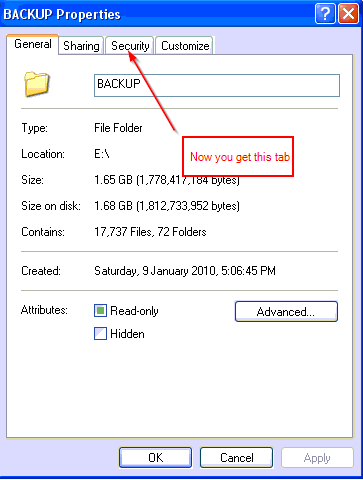
Scroll to the bottom and uncheck “Use simple file sharing (Recommended)”. Then Press OK.
Now you get the Security tab when you right-click and go to properties on a folder.

There is a lot of differing information concerning the disk space required to delete snapshots and have them merge back into the original VHD in a Hyper-v Virtual Machine.
Usually these conversations are forum posts where Sys Admins have performed a snapshot on purpose or by accident early on in the Server’s life and are now facing the prospect of merging back a massive differencing disk (AHVD) that has consumed what was left of the physical disk. The advice from others is usually to export the Virtual Machine to a larger disk, perform the merge and export and import it back again. This may or may not however be required (depending on your case) and wasn’t in our case, so please read on for a real world scenario.
Hyper-v Virtual Disk Types
Now I think that the varying reports on Hyper-v snapshot merging has come about because there are different types of Virtual Disks VHDs available to you in Hyper-V.

If you run in a production environment the consensis seems to be that running a fixed Size VHD is the best option. When you first create this type of disk it expands out and claims the physical disk space. This process can take a while, howevever with a new physical disk in the system this is great because it will likely claim a chunk of continuous space on the disk. You can expand the disk size in the future if you have more physical space but you can’t shrink it.
A dynamically expanding disk is another type of beast. It is fantastic for a lab because it only consumes from the physical disk what it uses in space. Over time though this type of disk could get so large that it fills your physical storage so beware. There are also overheads in constantly increasing the size of the VHD. I don’t recommend using them except in your lab, but they are important to be aware of in the case of snapshot merging.
Our Scenario
We provide IT Support on the Sunshine Coast and have been working a lot with Microsoft Virtualisation technologies. For this client we provided a 2008 R2 box running Hyper-v and a virtualised SBS 2011 running in it. It was a new install and a snapshot had been taken during the install process. Now Microsoft recommends not taking snapshots ever this to a production machine or any DC (there can be issues in rolling back to a snapshot) so don’t do it. There seemed to be no harm done in this case. Also, the snapshot button is so close to the VM Start that you might even accidentally hit it one day. A word to Microsoft – a great idea would be a switch to globally disable the ability to Snapshot.
The server had been happily running for a week and then we found the disk space was decreasing too fast on the host. Further investigations showed the snapshot was still on the system and the snapshot AVHDs had grown in size for the primary System VHD and the Data VHD. The Primary System VHD was 188Gb and the snapshot AVHD had grown to around 47Gb. The Primary Data VHD was 270Gb and the AVHD 12.5Gb. The original VHDs were Fixed Size disks which really helps in the merging scenario.

The Backup
We took a Hyper-v export of the Virtual Machine to an external drive as a precaution before performing the merge because of all the horror stories on the internet regarding merging. This is one of Hyper-v’s best features and allows you to move an entire virtual machine to another Hyper-v host if required. Simply shut down the Virtual Machine and then choose export from the sidebar menu (the option is not available when it is running).
The Merge into Fixed Disk VHDs
The actual merge was suprising. Being a fixed disk the differencing disk is played back into the existing space used by the VHDs. Here is a screenshot of part way through the process. The key was that there was absolutely no change in the physical space used on the hard drive. No these drives were RAID 10 SAS 10K so they perform well. The entire merge took 15 minutes from start to finish. That is merging around 60Gb of differencing disk.

As the process got towards the end the physical disk actually gained some free space as one of the AVHDs was probably deleted in the merge.

The AVHDs in this scenario were manageable. We haven’t tested it but there may be a problem if the AVHD gets bigger than the original Fixed size VHD. How that scenario would be realised I am not sure because of the physical limit on the original VHD – please comment if you have experienced in this.
But what about Dynamically Expanding VHDs
Well we haven’t tested this case in production, but Mooky32 on the Windows Server Forums has posted some lab tests in which he found that with a dynamically expanding disk you will require free physical space of up to the current size of the AVHDs you are merging. In our case that would mean we would need 60Gb of free space to perform the merge. This makes sense because as the AVHD is played into the dynamically expanding VHD it would need to expand out. Where this seems to be a problem for other admins is where a snapshot has gone un-noticed for some time and has taken up a majority of the physical drive leaving no space to expand the original VHD. In this case you would be forced to perform an export to a drive with enough free space, merge and then export and import back.
Conclusion
Our production result confirmed what Mooky32 found in his test lab. With the merge of a AVHD that was smaller than the original Fixed Size VHD, we found there was NO requirement for additional free space on the drive. Also the speed at which the merge occured was suprising.
Disclaimer: We are providing this information as background reading. Please consult official Microsoft documentation before performing any of the tasks outlined in our article. We do not accept responsibility for any loss, expense or liability that you may incur from using or relying on the information contained here.


This was my first real adventure into the land of vLans. I had setup very basic port-based setups before but this scenario required an 802.1Q Tagged vLan. The client runs serviced offices and required that the offices could share the internet but would not see each other on the network. The clients themselves use part of the office and had the requirement for several more ports than the other offices so it was allocated more ethernet ports on the switch. The gear used to complete the task is an inexpensive Netgear 716T 16 port Layer 2 Smart Switch and the very robust Draytek Vigor 2830n+ ADSL2+ Security Firewall Router. Normally if your client can afford it, such a scenario would be played out using High-end Cisco gear.
The outcome we looked to achieve is shown on the right.
Basically it is as follows…
- Port 1 & 2 – vlan 20 (192.168.2.x)
- Port 3 & 4 – vlan 30 (192.168.3.x)
- Port 5 & 6 – vlan 40 (192.168.4.x)
- Port 7 & 8 – vlan 50 (192.168.4.x) – same subnet as Ports 5 & 6 however the vlans keep them separated. Reason for same subnet – the Router only has the capacity for 4 subnets.
- Port 9-15 – vlan 10 (192.168.1.x)
- Port 16 – “Trunk” port to Draytek Router
Yes – if there weren’t too many devices connected to all the networks, we could have allocated all the vlans to the same subnet but we were trying to prove what could be done at the same time as creating a functional result.
First we enabled and then created the vlans in the Vlan Configuration menu in the Draytek 2830.
For some reason if every port on the Draytek is not allocated on this screen (even if it is not in use), the Draytek displays the error “Please set one vlan group at least! Please check port[x]”. If someone could tell me why this has to be done I would be interested to know. In any case we mapped vlan 10,20,30,40,50 to port 4 and allocated the subnets of LAN1-4 as shown in the image. You could set priority to the vlans if you want to prioritize certain traffic. We have not set that here. Then we enabled the various subnets under general setup and enabled DHCP on all of them. If you wanted to enable inter-lan routing you could do so here.


Because the GS716T has it’s own IP address for management, you will want to allocate it an IP address in the Draytek in the subnet where you want to manage it from. Find the mac address and add it to the Draytek under ‘Bind IP to MAC’. Here we gave it 192.168.1.2. The Draytek Router is 192.168.1.1.
Before plugging the two devices together, you are going to want to configure the GS716T. By default if it cannot find a DHCP server, it will use the address 192.168.0.239. Set your network card on a desktop or laptop to an address on that subnet and connect to it. You can use Netgear’s tool – the smart control center manager to find the switch or push in the button the front labelled “restore factory settings” to set it back to the default IP. The button labelled reset simply restarts the device keeping the current settings.
Go to the “switching” menu -> vLans and setup your various vlans. Here we have setup vlan 10,20,30,40,50 and left the defaults in the switch. Then go to vlan Membership under advanced. Select the vLan ID that you want to manage at the top. Then click on the little drop down for Port. This will open the boxes for each port. Flag each port member that you want to be a part of this vlan with a “U’ for untagged. On Port 16 that we are trunking to the router, we flag with a “T” for tagged. Press “apply” at the bottom. Do this for every port range that you want to apply to a vLan.


Now you need to setup the PVIDs – this is the default vLan ID for a port if the packet is untagged. Under Acceptable Frame Types we left this as “Admit All” becuase the other setting of “vLan only” only allows tagged vLan packets. We turned on ingress (inbound) filtering which means that only vLan traffic passes through. It works fine with this off but I figure it would stop unwanted network traffic. Make sure this is off though on your “trunk” port. We left port 16 (where we were managing from) as PVID 1 so we could continue to save the settings.
Finally set the Management vLan to the vLan you want to manage from under “System” -> “IP Configuration”. In this case vLan 10 – and apply. From this point on you will need to be on a vLan 10 port in order to manage the switch. Connect the switch and router together and your devices into the switch and watch the magic happen.You should get the correct subnets and not be able to ping other subnets (except the router).


I may have got some of the terms wrong and I’m happy for you to correct me if that is the case. I just hope this has helped someone else trying to achieve a result like this with affordable networking equipment for small businesses.
If you are on the Sunshine Coast and need Networking and IT Support, don’t hesitate to give us a call.

Exchange is a Corporate Email and Communication solution created by Microsoft that offers many benefits over traditional “POP” email accounts.
Contacts, Emails, Calendar and Reminders can all be automatically synced to mobile devices such as phones and tablets. It works perfectly with Microsoft Outlook, as Outlook was designed to work with Exchange in a corporate environment.
Imagine seeing the same email folders on every device wherever you go. Not only your inbox but all the subfolders too. You don’t have to plug your devices in to sync them either. It is all done via push technology through the internet via wi-fi or 3g. Send an email on your iPad and it will be in your Sent Items in your Outlook back at work.
The solution works with Outlook 2003/2007 and 2010 and almost all popular mobile devices including Android, iPhone and iPad.
Another benefit is that Calendars and Contacts can be shared between people in an organization. For example, a Secretary could take a call at the office and after viewing a Manager’s calendar from their own Outlook, they could enter an appointment into an available time on his/her calendar and have a reminder appear on the Manager’s mobile phone a few minutes later.
A shared contacts folder can also be created for all company contacts. This prevents the need for an extra CRM solution in small businesses. With shared contacts, if a staff member in the company updates a contact with some new details, it updates for everyone.
Until recently exchange solutions were usually reserved for companies that had the resources to install and manage an a on-premises server that runs Microsoft Exchange. For small businesses this would mean installing an SBS 2003, SBS 2008 or SBS 2011 server at the company’s office. The mobile devices then communicate back to the main office through the internet to keep in sync. This is the perfect solution where a file server or database server is also required on-site. Typically OJ Networks installs servers for companies of around 10 users or more. Depending on your company’s needs, you may not need an on-premises server and could consider a hosted exchange solution.
A ‘Hosted’ Exchange Solution simply means that instead of having an email server on your premises to provide this functionality, you host your emails on a Microsoft server on the Internet (cloud). The server doesn’t store files but only the email solution. You get almost all of the benefits of an on-premises solution (except public folders).
OJ Networks are resellers of Hosted Microsoft Exchange Solutions which start at only $7.10 per mailbox per month for 25gb of storage per mailbox. Speak to us today to get a quote for converting your small business over to hosted exchange. Your business will surely benefit from being so in sync.

When you get the dreaded Device not recognised or Not formatted. Would you like to format? on a USB drive, or your computer won’t boot with a No boot device available or similar message – then you may have experienced what most of us will in our lifetime – a hard drive failure.
When this happens there are options for recovery. Sometimes only part of the disk is damaged or written incorrectly and advanced recovery software can rebuild the “table of contents” of the drive and allow recovery to another drive – OJ Networks can help in these cases. We can boot your system from a USB stick or CD and run recovery tools over the drive. Sometimes we need to remove the drive and put it in a hard drive caddy to complete the recovery. Items are usually recovered to another USB drive. Often times you may lose at least some of the data because part of the drive or certain files are damaged.
In worst case scenarios – often when the drive is not recognised and is making a clicking or griding noise – the arm inside the drive has crashed into the spindle of discs. This is the hardest and most expensive recovery and as it involves a specialised service who often pull the drive apart in a vacuum sealed environment. Recovery in these cases costs over $1000.
We suggest that all important data is set to be automatically backed-up to avoid these situations.
Make sure you have two copies on different drives (or the cloud!). OJ Networks can provide backup solutions for your business.
[quote align=”center” color=”#999999″]Remember that just because it is an external drive doesn’t make it a “backup”![/quote]


Very strange problem at a Sunshine Coast Business IT client where quotes “ and apostrophes ‘ would not display until the client pressed another key. Then this key and the quote or apostrophe would appear on the screen.
I did some further testing and the tilde ~ and the hat (is that what it is called?) ^ also didn’t appear when pressed until another key was pressed. The problem continues to appear even if another keyboard is installed. So the setting had to be inside the Windows 7 Settings.
Checking in the keyboard settings it was apparent that the system was set to United States-International for it’s keyboard layout. In Australia we use standard US keyboards so I changed it back to US and removed the United States-International keyboard just for good measure.

After pressing OK, I tested it on a Word Document and the issue still remained. However after a reboot the system went back to normal and the client could use apostrophes and quotation marks mand get on with their job. I’m not sure why the system had changed to International keyboard layout- whether windows did it or the user did inadvertently I cannot be sure. It is an easy solution though thankfully.
Managed Services With FREE Credit Each Month!
 Does your IT company offer to look after your IT requirements for a Fixed Monthly Fee AND give you FREE Credits every month?
Sign up to a managed services plan with us and you get credit every month that you can use immediately or save up to use on Hardware, Software or large projects such as new server installs or office relocations.
Enquire Now or Call 5329 3200